How to add a newly listed stock/security in DownLoader XV
Keywords: Missing stock, new float, new IPO, newly listed
With the release of DownLoader XV we also released our new file format. This document will help you create new local data files, update them via DataLink and get them into MetaStock XV. The new file format database will support up to 100000 individual securities and can contain 100000 records each. Each folder will have its own database. The file can grow quite large.
To create a new local data file in DownLoader XV:
- Open DownLoader
- Select the Download tab in the DownLoader Console
- Click the Add button
- Select a folder in which to create your new local data files
- eg. Under your Documents folder, select the MetaStock folder
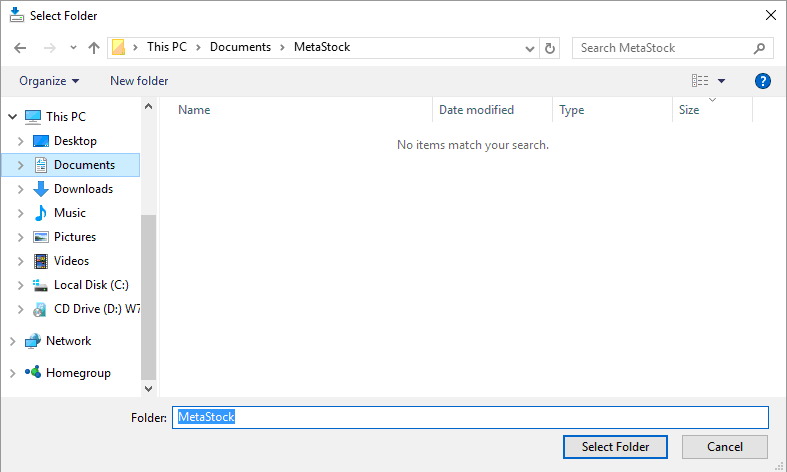
- If you wish to create a new sub-folder to help organize your data, click the New folder button
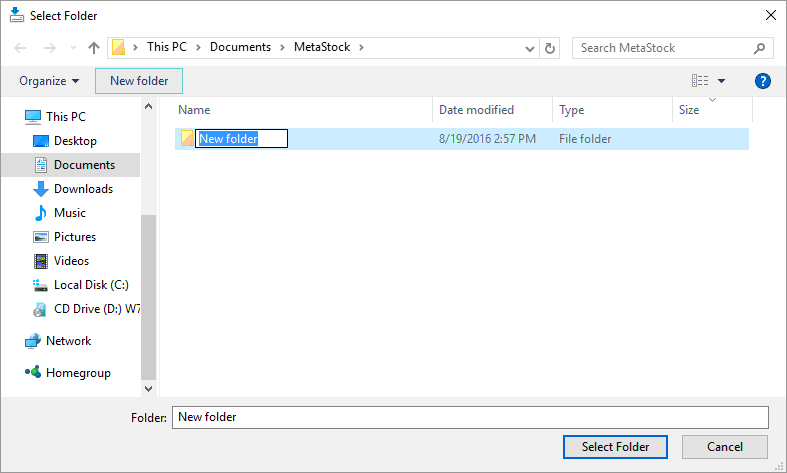
- Name it accordingly (e.g. Stocks)
- eg. Under your Documents folder, select the MetaStock folder
- Click the Select Folder button
- Right click on the newly created folder
- Select Create new security…
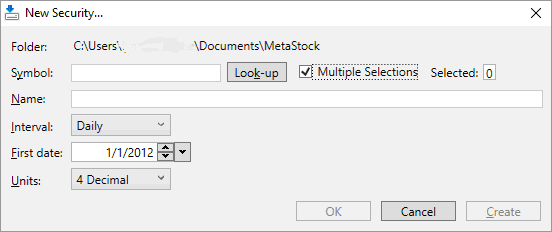
- Type in an instrument into the Symbol field
- If you need help finding the instrument, click the Look-up button
- If you wish to create a large number at once, select the Multiple Selections option, then click Look-Up
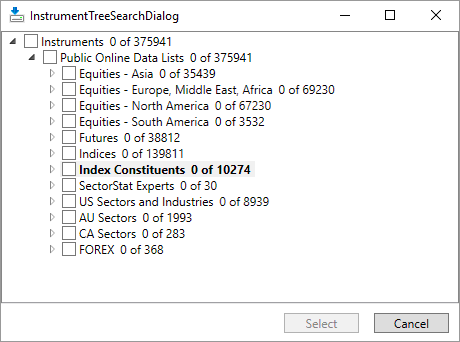
- Double click the folder, or click the arrow on the left side of the folder name, to expand the list (e.g. Index Constituents)
- Select the box next the folder or individual ticker that you wish to add
- Click Select
- Enter a Name (If you used the Look-up the name will be filled in automatically. If you leave the field blank, the symbol will be used as the name.)
- Set the desired Interval
- Supported intervals are Daily, Weekly, Monthly and Yearly.
- Intraday intervals are not currently supported.
- Set the First date field to the desired date where you want to collecting data.
- Default is five years. If you change this, the application will remember your change
- Change the Units, if necessary.
- Click OK
- If you need to create more, click Create in the above step and the repeat and click OK on the last one
To download the new local data files:
- Make sure all of your folders are added to the list in the Download tab
- The steps above should have added the folder automatically. If there are others, use the Find button to make sure they are all added
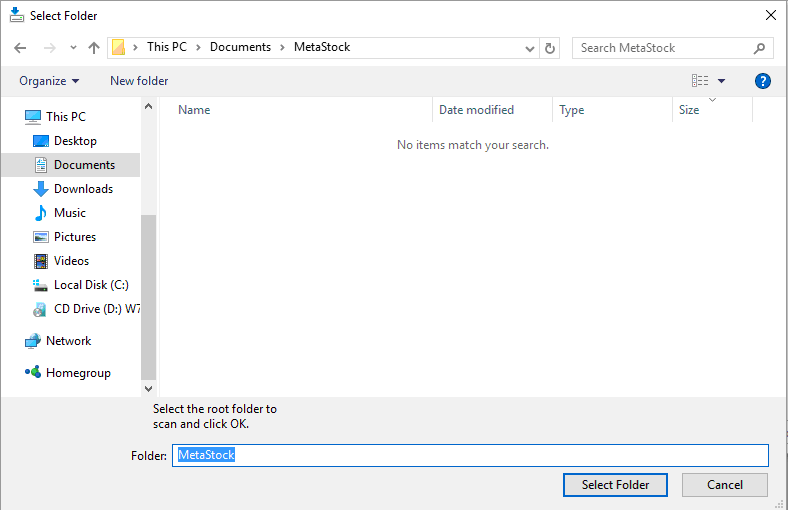
- Click the Find button
- Select the root folder that contains all of your data folders (e.g. Documents\MetaStock)
- The steps above should have added the folder automatically. If there are others, use the Find button to make sure they are all added
- Click Select Folder
- Check the Use current date option to ensure you have the latest complete day’s data.
- You can uncheck the option and set it to a date in the past if you wish. Please note that you may not current data with the option is unchecked.
- Verify that the Recollect commodities option is checked if you download Futures data to ensure you are collecting the prior day’s volume and open interest. If you do not collect this type of data it will not matter if this option is checked or unchecked.
- Check the option to Include partial bars, if you wish to collect the current days snapshot data (does not apply to all data vendors or markets. DataLink does offer this service). The data will be update the next time you download data
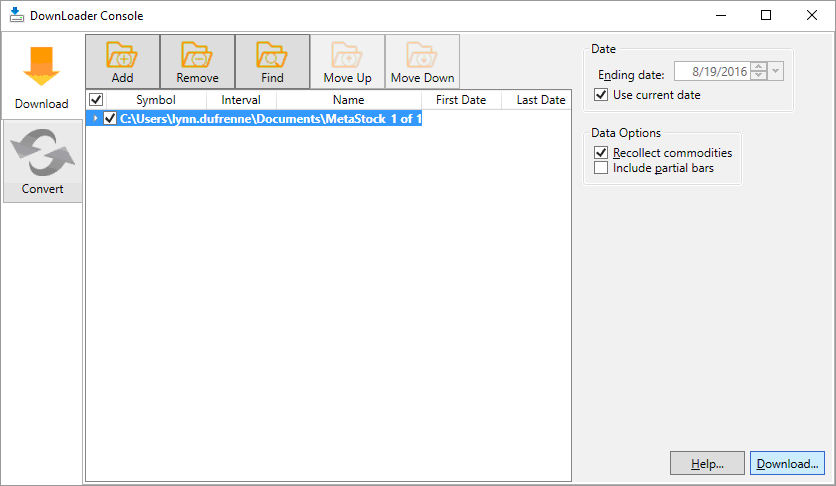
- Click the Download button in the lower, right corner of the DownLoader Console
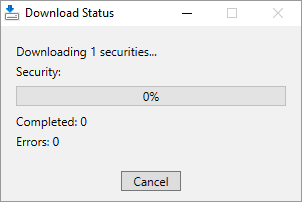
- The Download Status window will show the progress and when complete you will be prompted with the Collection Report
- The report will show you all of the securities that were in the download attempt with a status indicator next to each
- Green check means the download was successful
- Red cross means there was an update/correction
- The report will show you all of the securities that were in the download attempt with a status indicator next to each
- An “X” means an Error
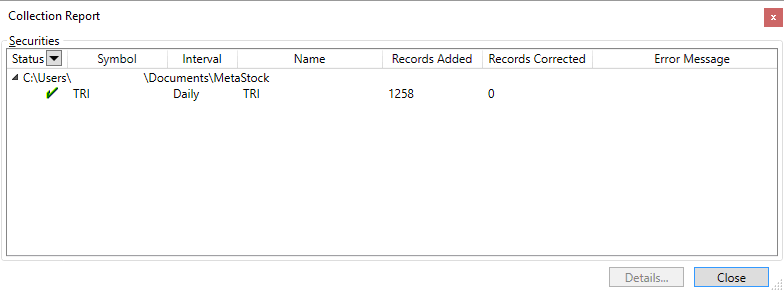
- Double click on the security in the report (or select the item and click Details) to see a detailed Security Report
- Click Close when complete with the detailed report
- Click Close to dismiss the Collection Report
- If you want to see the most recent report again, open the View menu and select Last Collection Report
To create a new custom list of Local Data files in MetaStock:
- Double click on Local Data Lists or right click on Local Data Lists and select New
- Give the list a name
- Add the desired instruments
- Click Browse (It should look in the Documents\MetaStock folder by default)
- Click Browse
- Open the folder that contains your local data
- Supported file formats are the new MetaStock, older MS Legacy, and CSV)
- Click Select Folder
- Select the file(s) and click Add
- Click Save
- Or click Add from existing list
- Open the existing list, under Local Data lists, by clicking the triangle to the left of the list and select the desired file(s)
- Click Add
- Click Add Instrument(s)
To add an instrument to an existing Local Data custom list:
- Double click on the name of the existing list that you wish to add to or right click on the existing list and click Edit.
- Click Browse (It should look in the Documents\MetaStock folder by default)
- Click Browse
- Open the folder that contains your local data (supported file formats are the new MS Local data, older MS Legacy, and CSV)
- Click Select Folder
- Select the file(s) and click Add
- Click Save
- Or click Add from existing list
- Open the existing list, under Local Data lists, by clicking the triangle to the left of the list and select the desired file(s)
- Click Add
- Click Add Instrument(s)
- Right click in a chart
- Select Add to Custom List
- Select an existing list and click OK
- Or click Create New
- Define a name for the new list
- Click Create
- Select Add to Custom List
- Click Ok